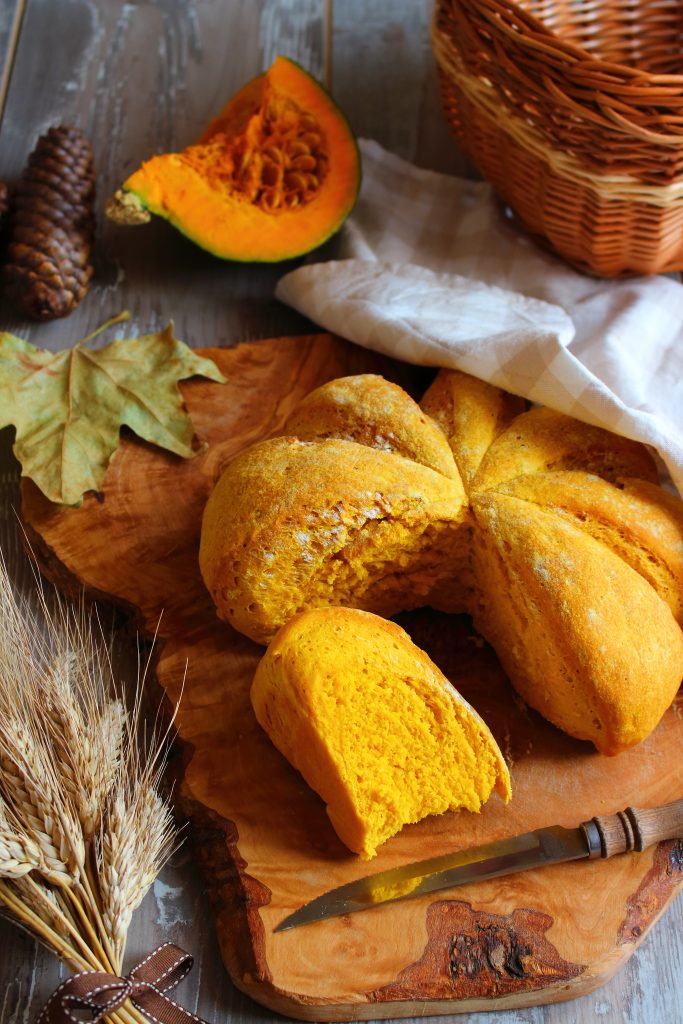
La ricetta che apre la nuova stagione non potrebbe essere più autunnale di così! L’autunno in genere è la stagione delle novità, dei cambiamenti, dei nuovi inizi. E’ la stagione dai morbidi colori caldi, delle serate con le copertine davanti a un buon libro e una tazza di tea fumante, delle torte di mele appena sfornate, delle lunghe passeggiate nei boschi in cerca di castagne e funghi. E’ anche la stagione della zucca. Un ortaggio estremamente versatile, adatto alla preparazione di dolci e salati.
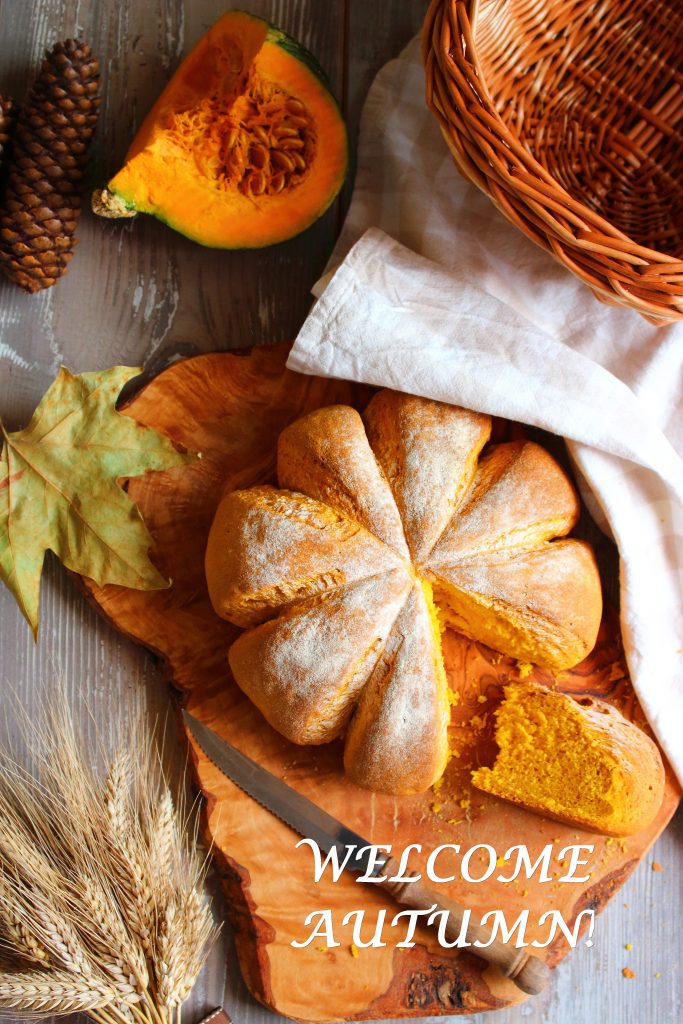
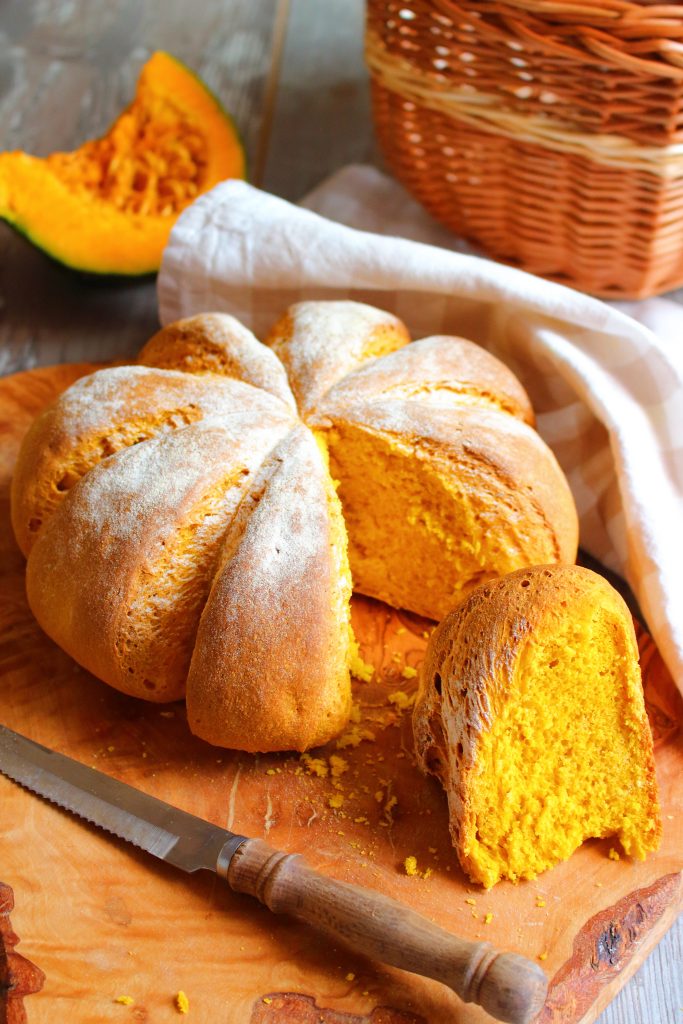
Ve lo avevo già raccontato che in questo periodo sono particolarmente in vena di fare il pane! Mi piace impastare e vedere l’impasto crescere sotto il canovaccio. Con le prime zucche dell’orto ho voluto preparare proprio un pane, soffice all’interno e croccante all’esterno, dallo spiccato colore giallo. Lo avevo già preparato in passato ma avevo dovuto aggiungere la curcuma per ottenere il colore sperato. Il segreto invece, è utilizzare la polpa della zucca mantovana che è poco acquosa e molto arancione, il che permette di ottenere un pane dal colore vivace e brillante sfruttando unicamente il pigmento naturale presente nell’ortaggio.
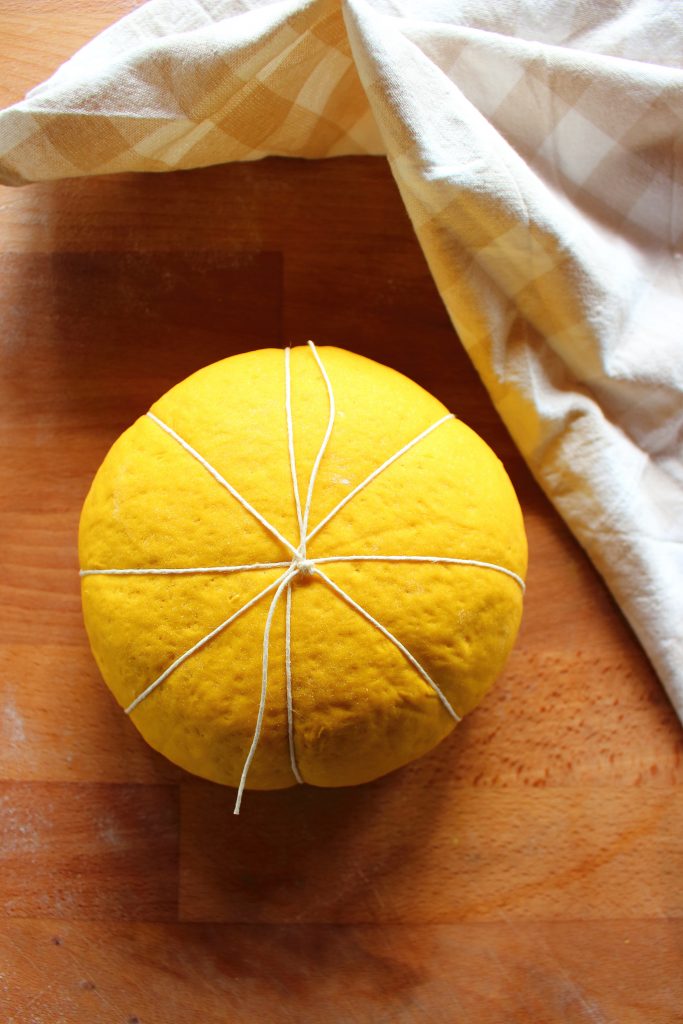
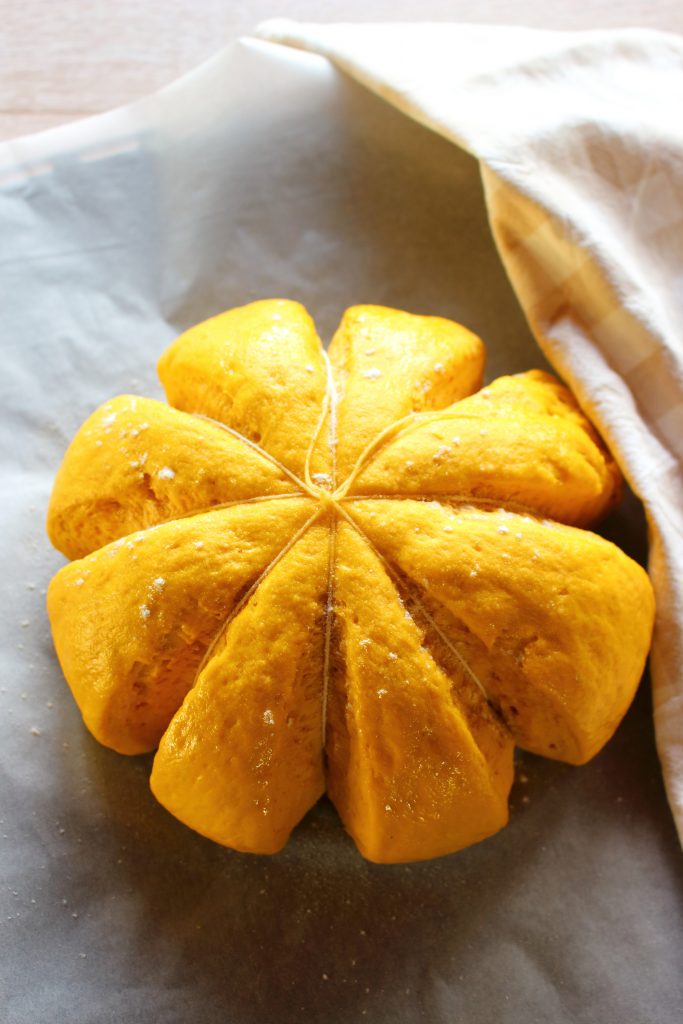
Il tocco da maestro in questa ricetta però consiste nella legatura del pane! Utilizzando del semplice spago da cucina otterrete un pane dalla forma che assomiglia proprio a quella di una vera zucca. Un trucchetto facile con il quale ottenere un risultato davvero originale! Perché si sa: si mangia prima con gli occhi! Segnatevela allora questa ricetta, che Halloween è vicino! Non si sa mai, quest’anno potreste aver voglia di portare in tavola lo scherzetto invece del dolcetto…
Per 2 forme di pane da circa 800 g l’una:
800 g farina 0 (ideale per pane e pizza)
200 g farina manitoba
3 cucchiaio olio extravergine di oliva
700 g purea di zucca mantovana
12 g sale
2 cucchiaini di zucchero semolato
3 g lievito di birra secco ( oppure 10 g lievito di birra fresco)
salvia e rosmarino
1) Sbucciate e pulite la zucca, tagliatela a pezzi e cuocetela a vapore con le erbe aromatiche fino a che diventerà morbida. Rimuovete gli odori e frullate la zucca in un mixer fino ad ottenere una purea omogenea.
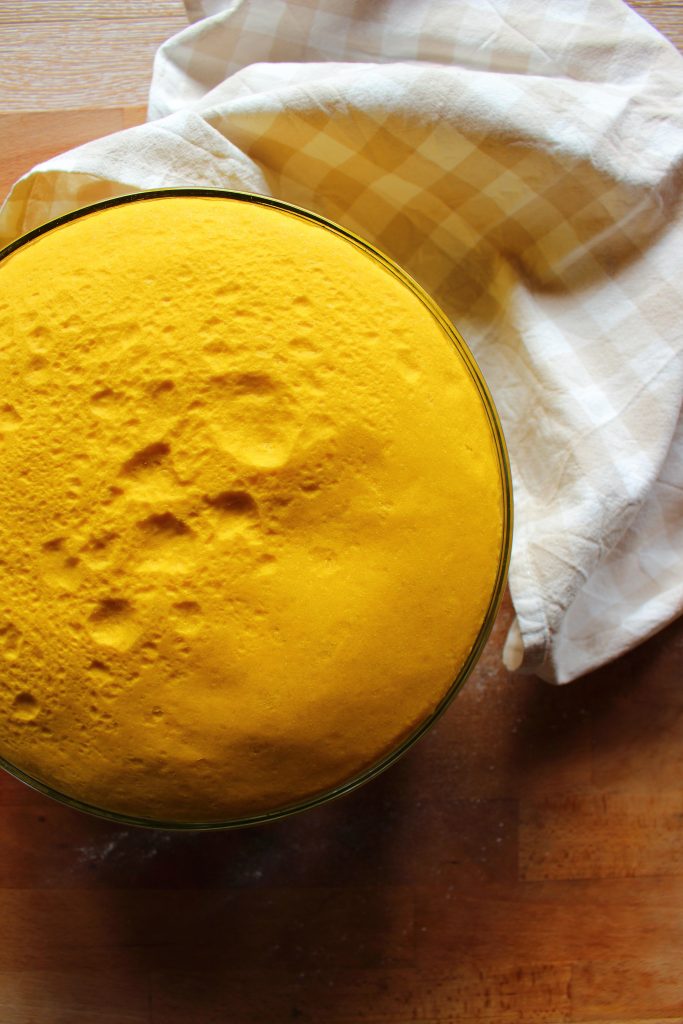
2) In un ciotola capiente versate le farine, il lievito, lo zucchero, l’olio e dal lato opposto il sale. Aggiungete la purea di zucca oramai tiepida e amalgamate bene tutti gli ingredienti. Trasferite l’impasto su di una spianatoia infarinata e impastate vigorosamente per 10-15 minuti. Dovrete ottenere un impasto morbido, elastico e liscio ma non appiccicoso. Dopodiché trasferite l’impasto nuovamente nella ciotola, sigillate con pellicola trasparente e mettete a lievitare per 4-5 ore nel forno spento con la luce accesa, oppure in qualsiasi altro luogo caldo e al riparo dagli spifferi. Il volume dovrà quasi triplicare.
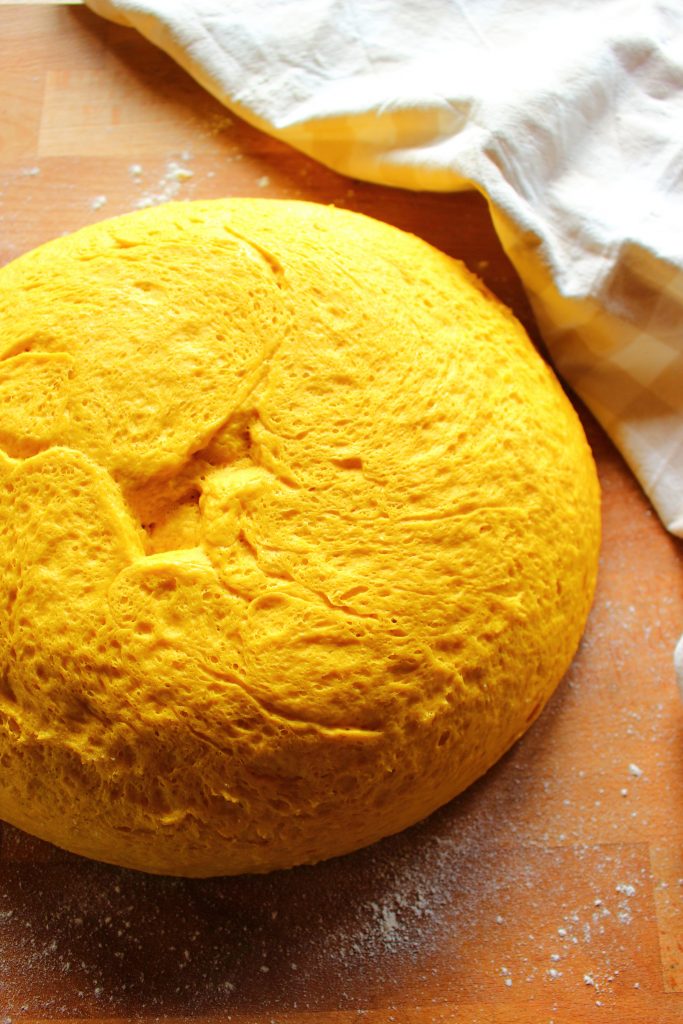
3) Rovesciate l’impasto su un piano di lavoro leggermente infarinato e dividetelo in due parti uguali. Con ciascuna metà formate una palla, pirlate l’impasto e legatelo in modo tale da formare 8 spicchi ( oliate lo spago da cucina, sarà più facile rimuoverlo in seguito). Spolverate la superficie con poca farina e coprite nuovamente l’impasto con un canovaccio umido. Lasciatelo lievitare un’altra ora.
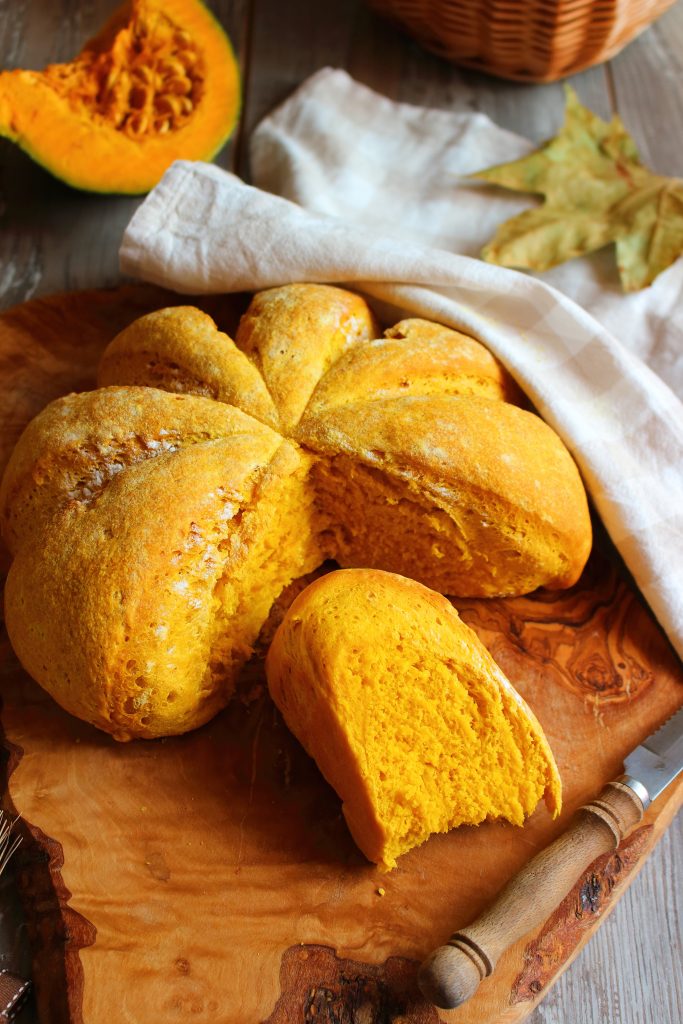
4) Preriscaldate il forno in modalità statica a 200°C. Spennellate il pane di zucca con poco olio di oliva e infornate per 10 minuti. Abbassate la temperatura a 180°C e proseguite la cottura per circa altri 25 minuti. Verificate che il pane sia cotto picchiettando il fondo e accertandovi che produca un suono cavo.
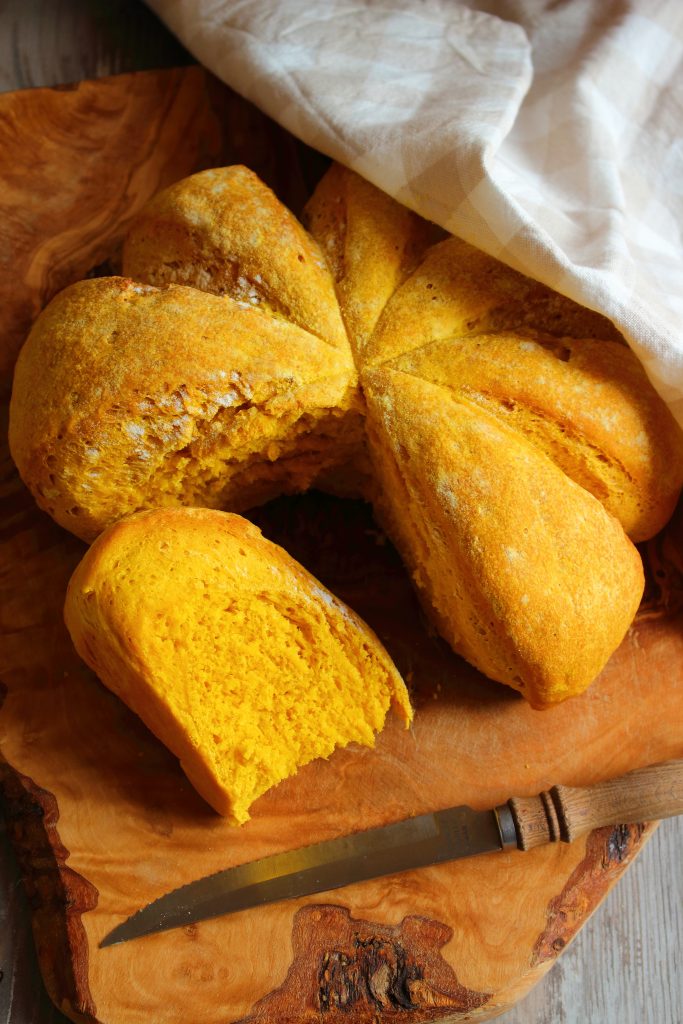
5) Lasciate raffreddare il pane di zucca su una gratella per dolci. Prima di tagliarlo, rimuovete lo spago da cucina con una forbice.
Per una migliore riuscita del vostro pane vi consiglio di spruzzare dell’acqua sulla superficie della pagnotta nel momento in cui la state infornando. Otterrete così una crosta più croccante e una maggiore crescita in forno!
Se ne avanza, conservatelo in un sacchetto di plastica. Si mantiene morbido per 2-3 giorni. Potete eventualmente tagliarlo a quadrotti e tostarlo in forno a 200°C con un filo d’olio e poca noce moscata. Otterrete degli ottimi crostini per accompagnare una calda zuppa autunnale!

Recipe courtesy by Gabriele Bonci
Se questa ricetta ti è piaciuta e vorresti vederne delle altre allora iscriviti al mio website e seguimi tramite i canali social, cliccando direttamente in alto a destra nella home page per rimanere sempre aggiornato sulle ultime novità! Ti aspetto!
Se rifai una delle mie ricette, scatta una foto e taggami su Instagram con l’hashtag #cinnamonloverblog.
SCROLL DOWN FOR ENGLISH VERSION
PUMPKIN BREAD
Autumn has become one of my favourite parts of the year. When I was a child I couldn’t really see the beauty of this season because it used to correspond with the beginning of a brand new school year. Now I actually appreciate it. I can see the nature changing its habits. I can see the warm sun shining and lighting up the thousands falling leaves. Every single moment captures my attention and I cannot help admiring all the things that make this season so special and unique.
For me Autumn is all about cosy afternoons in front of a good book and a steming hot cup of tea, freshly baked apple pies cooling down on the counter and spreading their heavenly smell of cinnamon all over the house, long strolls into the woods in search of mushrooms and chestnuts. Last but not least Autumn is about pumpkin! I love pumpkin for its sweetness and its bright and vibrant color. It simply makes the perfect ingredient for both sweet and savoury recipes!
Since it’s finally Autumn I thought it would have been nice to be able to use pumpkin into one of my bakes. Currently I’ve been in a kind of bread mood so I’ve decided to bake a pumpkin loaf. This autumnal vegetable doesn’t modify consistently the overall flavour of bread instead it gives it a marvellous yellow hue and an incredible tenderness.
As you can see I also tied my bread just with some simple butcher’s twine before proving it. The result is a loaf that pretty much resembles a real pumpkin, you know…. just to give it a much more fancy look! It simply makes the perfect edible centrepiece for the upcoming autumnal dinners at home and why not… even for Halloween!
Ingredients for two 800 g loaves:
1 kg white strong bread flour + a little more flour for dusting
3 tbsp extra virgin olive oil
700 g pumpkin purée
12 g salt
2 tsp caster sugar
3 g instant dry yeast ( 10 g if you use fresh yeast and you’ll need to dissolve it into a bit of warm pumpkin purée)
sage and rosemary
1) Peel, remove the seeds and dice your pumpkin. Steam it with some sage and rosemary until it becomes really tender. Add the cooked pumpkin in a food processor after removing the herbs and purée it. Let it cool down just a little bit.
2) In the meantime, weight out your flours in a large bowl, add salt, sugar, dry yeast, olive oil and finally even the warm pumpkin. Combine these ingredients with a spoon until you form a dough, then tip the dough out onto a lightly floured working surface and knead vigourosly for at least 10 to 15 minutes. You must get a smooth and elastic bread dough. Put the dough back into the bowl, previously oiled, and cover it with some cling wrap. Let it rise for 4-5 hours in a warm place.
3) Flip the dough over the working surface, divide it into two parts and form them into two balls. Now tie each loaf with some butcher’s twine, as you can see in the pictures. Cover each loaf with a damp tea towel and prove for 1 hour. At the end you’ll see the loaf will look just like a pumpkin.
4) Preheat the oven to 200°C/ 393°F. Brush your pumpkin bread with some olive oil and pop it into the oven. Bake it for 10 minutes. Lower the temperature to 180°C/ 356°F and bake it for another 25 minutes. Tap it gently underneath; it should sound hollow. Turn it onto a wire rack to cool down and cut through the butcher’s twine.
Store your pumpkin bread in a plastic bag for 2-3 days. If you want, you can dice it and toast it in the oven with a little drizzle of olive oil and a pinch of nutmeg. Use these croutons to top off your hearty autumnal soups!
I hope you enjoyed this recipe and if you did, don’t forget to leave a comment below and follow me on social media, by clicking in the upper right-end corner of my home page. See you there!
If you decide to make one of my recipes, take a nice picture and tag me on Instagram with the hashtag #cinnamonloverblog . I’ll be delighted to see your bakes!